Viloma pranayama expands our prana – our life force, cosmic energy or breath – and therefore our total wellbeing.
Viloma brings a feeling of ease and calm vitality to the body-mind and emotions.
As it’s learned in stages, it’s also safely accessible to all, and a great technique to enhance your experience of breathing practices.
Over time, it increases our breathing capacity. We find we are able to breathe more deeply. This is advantageous for our nervous system and its parasympathetic branch, bringing us into ‘rest and digest’ mode rather than ‘fight or flight’.
Practising Viloma 1 involves controlling the inbreath with the use of comfortable pauses before releasing a seamless, continuous outbreath. Viloma can be translated as ‘against the grain’ or ‘against the natural order of things’, meaning that the breath is interrupted.
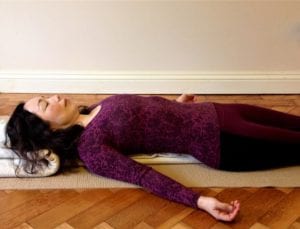
We normally sit for pranayama, yoga’s powerful body of breathing practices, but a number of introductory techniques, including viloma 1 can be practised in a reclining position for ease.
Below you can see a few options for how to recline. Please choose whichever one is most comfortable for you – this makes all the difference when practising the technique.
Option 1: with four blocks and a blanket for the head
Arrange four yoga blocks as below and cover them with a blanket to soften the edges. You may also like to have a slight raise for your neck and head, using a second blanket.


This option creates a lifting of the chest, creating space between the ribs and for the diaphragm muscle to soften and move freely during respiration. This also gives space to the abdominal area for belly breathing in the first stage of the practice. The collar bones spread and the shoulders drop down. All the respiratory muscles function smoothly.

Option 2: with a bolster under the back
A slightly higher lift (and greater opening) is created by using a yoga bolster in place of the blocks (see below), with or without a blanket under the head. The lower back feels free.
You’ll need to feel the best position for the lower end of the bolster. I like to leave a little space between it and my lower back for comfort. Some like to place additional, soft support in this space.
The rolled up blanket under the knees gives further comfort for the lower back, and guards against hyper extension in the knees.

Option 3: with two blankets – one under the back, the other under the head
If the raise above feels too big, for example, if you feel too much of a stretch or pull in your chest or shoulders due to tightness there, fold a blanket into a rectangular shape and use it instead of the bolster or blocks. The blanket is narrower than the width of the torso, so that the shoulders can fall comfortably downwards.
The second blanket supports the head and neck. Make a small roll to fit into the nape of the neck.
Option 4: with a bolster under the knees
If the above options still feel too ‘open’ or uncomfortable for your lower back, try lying flat on the floor and place a bolster under the knees. You may like to have a blanket under your neck and head.

How to practise viloma 1
To simplify the process, we’ll separate the inbreath into three parts. So:
— Inhale evenly and gently through the nose from the base of the spine to the navel (this will take a few seconds). Pause for two seconds.
— Inhale again in the same manner from the navel to the solar plexus. Pause.
— Inhale again from the solar plexus to the collar bones. Pause.
— Exhale evenly, slowly and gently all the way out. This completes one cycle.
— Take up to five natural, uncontrolled breaths before starting the next cycle.
— Repeat: the inbreath in three parts with three pauses, long uninterrupted outbreath, five natural breaths.
— Continue to repeat the cycle and the natural breaths in between up to five times if you are a beginner, or up to ten times if you are more experienced. If your breathing becomes uneven or uncomfortable at any time, let go of viloma 1 and return to your natural, uncontrolled breathing rythmn.
— At the end of your cycles remain where you are for some moments and breathe naturally. Enjoy being in the expanded bubble of prana.
With practice, you’ll notice your breaths becoming longer, slower and ‘bigger’. This has a profound impact on our health and wellbeing.
To exit, allow the knees to come effortlessly in towards your chest, roll over to your right side and support your head with your right hand/arm. Stay here for a few moments before coming up to sitting. An alternative is to roll carefully over to the side, remove the props while keeping the eyes closed if possible and then to roll back into savasana for up to 20 minutes. Bliss.
Notice how you feel when you stand up. Taller? Brighter?
When to practice viloma 1
Viloma 1 fits wonderfully at the end of asana practice, before savasana (relaxation pose), or on its own at the end of a working day or later in the evening.
I hope you enjoy viloma 1, the feeling of ease and calm vitality it brings, and the expansion of your life force. You’ll feel the impact of this on your mental clarity and wellbeing in everday life.
Photos: author’s own
You may also like:
Hasta prana mudras for energy
Alternate nostril breathing for balance
Humming bee breath for focus and happiness
Please share with your yogi friends: